If you have a fiberglass boat, chances are you will be needing repair done at some point. We have seen some pretty shoddy repair work come through but we will not do repair work like that.
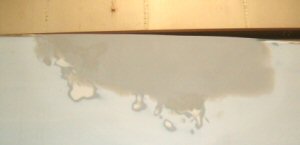
The first step to a fiberglass repair is to assess the real damage. In a lot of cases the damage goes a lot further than the initial inspection would lead you to believe. It is best to follow the damage as far as possible to get an idea of how the repair will be approached. In a case like the picture above, the damage was on solid fiberglass so it was easy to see where all the damage was. Had this been a cored boat, however, the impact may have cause the fiberglass to separate from the core, which would dictate a different repair type.
To follow the repair steps, we will be discussing the repair above in this article. Our fiberglass technician has ground the shattering back to solid glass as the first step. It is better to err on the side of too much rather than too little to ensure no cracking will emerge after the boat is back in service.
If you have a fiberglass boat, chances are you will be needing repair done at some point. We have seen some pretty shoddy repair work come through but we will not do repair work like that.
The first step to a fiberglass repair is to assess the real damage. In a lot of cases the damage goes a lot further than the initial inspection would lead you to believe. It is best to follow the damage as far as possible to get an idea of how the repair will be approached. In a case like the picture above, the damage was on solid fiberglass so it was easy to see where all the damage was. Had this been a cored boat, however, the impact may have cause the fiberglass to separate from the core, which would dictate a different repair type.
To follow the repair steps, we will be discussing the repair above in this article. Our fiberglass technician has ground the shattering back to solid glass as the first step. It is better to err on the side of too much rather than too little to ensure no cracking will emerge after the boat is back in service.
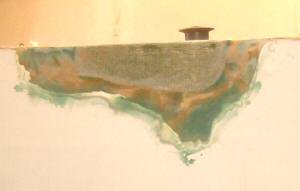 We have seen boats where damaged areas were just filled with body putty. Cosmetically this may work, but structurally there has been virtually no repair work done. Plus, because there is no strength to the filler, any impact will cause the area to be damaged again. We actually rebuild the glass from the inside out. To the right, you can see that there are layers of combo mat being laid in to bring the ground area almost up to the surface of the surrounding area. Smaller cavities are filled with 3M High-Strength filler before having the glass cloth applied.
Subsequent layers are added until the repair is where we need it to be. Since the glass material has a lot of texture, we will fair the top, again with 3M High Strength Filler. Now the approach will branch off in two directions – either a painted surface or a gelcoat surface. The paint is much faster to finish but works best with boats that are already painted. To fix a gelcoated boat, extra steps are required. With either method there are two determining factors for the “perfect repair”. One is to fair enough to make the area as flat as the surrounding area. The second is color matching.
We have seen boats where damaged areas were just filled with body putty. Cosmetically this may work, but structurally there has been virtually no repair work done. Plus, because there is no strength to the filler, any impact will cause the area to be damaged again. We actually rebuild the glass from the inside out. To the right, you can see that there are layers of combo mat being laid in to bring the ground area almost up to the surface of the surrounding area. Smaller cavities are filled with 3M High-Strength filler before having the glass cloth applied.
Subsequent layers are added until the repair is where we need it to be. Since the glass material has a lot of texture, we will fair the top, again with 3M High Strength Filler. Now the approach will branch off in two directions – either a painted surface or a gelcoat surface. The paint is much faster to finish but works best with boats that are already painted. To fix a gelcoated boat, extra steps are required. With either method there are two determining factors for the “perfect repair”. One is to fair enough to make the area as flat as the surrounding area. The second is color matching.
 Below: fairing for the final top coat