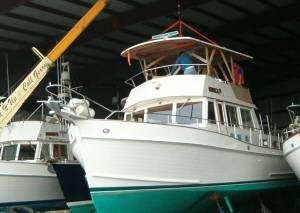
 For a really unique look that is durable and weather resistant, you may wish to consider a hard top in lieu of the standard canvas fly bridge coverings. In addition to being a good looking addition, it gives you the opportunity to add overhead lighting and adds room for electronics above.
We got lucky on this job because the flybridge was large enough to use the mold we had already built for our top, which gives a far superior look than any one-off piece that could be fabricated. Being the first off of any type of project demands a lot more engineering work than subsequent projects of the same type. We were adamant about having the supporting structure aesthetically appealing, yet strong enough to withstand any conditions it may encounter.
For a really unique look that is durable and weather resistant, you may wish to consider a hard top in lieu of the standard canvas fly bridge coverings. In addition to being a good looking addition, it gives you the opportunity to add overhead lighting and adds room for electronics above.
We got lucky on this job because the flybridge was large enough to use the mold we had already built for our top, which gives a far superior look than any one-off piece that could be fabricated. Being the first off of any type of project demands a lot more engineering work than subsequent projects of the same type. We were adamant about having the supporting structure aesthetically appealing, yet strong enough to withstand any conditions it may encounter.
 To meet our requirements using off the shelf parts, we opted to go with larger stainless piping than our original design. When you get to this size, you do not have the size options you may want without going with special order materials – which would put the top over budget. We also wanted to avoid a “fishing boat” look and using the bigger piping definitely helped with that concern.
To get the piping right, we had the top built first from our mold. We then built a temporary structure to hold the top in the position it would be in at the finish of the job. Using this technique, the fabricator and our designer were able to mock up the parts using PVC pipe and duplicate this mock up off-site. The finished project was a perfect fit.
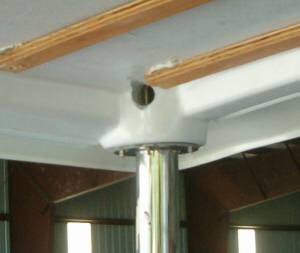
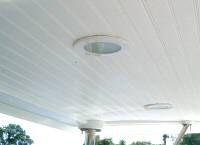
After the mock up was built and the supports figured out, the top went back to the fiberglass shop to have a liner installed. The liner has the pads molded in so the whole top looks like a factory job. Spacers were installed to add the headliner. The spacers also give room for wire chases and flush lights inside the top.
To meet our requirements using off the shelf parts, we opted to go with larger stainless piping than our original design. When you get to this size, you do not have the size options you may want without going with special order materials – which would put the top over budget. We also wanted to avoid a “fishing boat” look and using the bigger piping definitely helped with that concern.
To get the piping right, we had the top built first from our mold. We then built a temporary structure to hold the top in the position it would be in at the finish of the job. Using this technique, the fabricator and our designer were able to mock up the parts using PVC pipe and duplicate this mock up off-site. The finished project was a perfect fit.
After the mock up was built and the supports figured out, the top went back to the fiberglass shop to have a liner installed. The liner has the pads molded in so the whole top looks like a factory job. Spacers were installed to add the headliner. The spacers also give room for wire chases and flush lights inside the top.
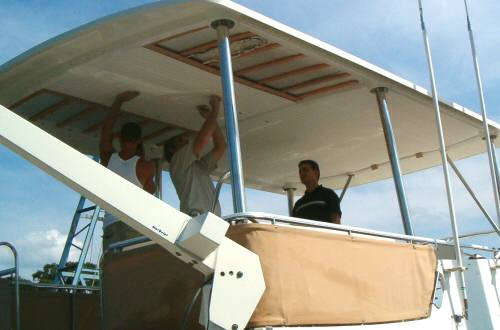 By the time the top was done, the supports were in place. Perhaps the hardest job we had was turning the top over. It took about 10 people and the travel lift to turn the top back over after working on the underside. But with that accomplished, we were able to lift it with the travel lift and set it in place on the supports.
Since good attachment is crucial to stability, we through bolted all the fasteners through the top and used custom backing plates on the top. We fashioned these from aluminum and painted with Awlgrip. We could have used stainless, but we did not want them to be so noticeable and aluminum is more “paint-friendly”. After bolting in place one of our workers climbed up and tried to get the structure to sway. It was a success in that instead of the top swaying, the whole boat swayed. We had achieved rigidity.
By the time the top was done, the supports were in place. Perhaps the hardest job we had was turning the top over. It took about 10 people and the travel lift to turn the top back over after working on the underside. But with that accomplished, we were able to lift it with the travel lift and set it in place on the supports.
Since good attachment is crucial to stability, we through bolted all the fasteners through the top and used custom backing plates on the top. We fashioned these from aluminum and painted with Awlgrip. We could have used stainless, but we did not want them to be so noticeable and aluminum is more “paint-friendly”. After bolting in place one of our workers climbed up and tried to get the structure to sway. It was a success in that instead of the top swaying, the whole boat swayed. We had achieved rigidity.
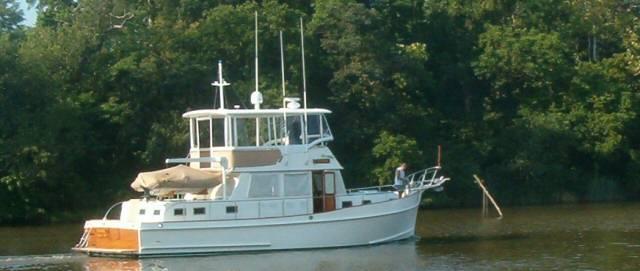
Finished hard top leaving the dock
