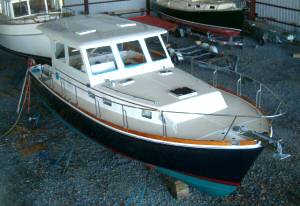
 A few months ago, I started an article on converting an Eastbay 38 Express into a hard top model. At that point we had the hard top mold done and since have used that mold for a Grand Banks 46 and have fabricated the top for the Eastbay 38 Express we had in stock. We have also built the mold to do the cabin sides.
Our goal for the cabin sides was to have the “factory-look”, no support systems other than the cabin sides themselves, no seams in unnatural places and great windows for lighting and visual aesthetics. If the mold is constructed properly, it can be used for more than one application – like our top mold.
A few months ago, I started an article on converting an Eastbay 38 Express into a hard top model. At that point we had the hard top mold done and since have used that mold for a Grand Banks 46 and have fabricated the top for the Eastbay 38 Express we had in stock. We have also built the mold to do the cabin sides.
Our goal for the cabin sides was to have the “factory-look”, no support systems other than the cabin sides themselves, no seams in unnatural places and great windows for lighting and visual aesthetics. If the mold is constructed properly, it can be used for more than one application – like our top mold.
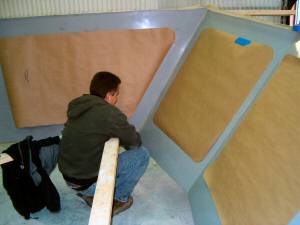
 1. The Mock Up – The first step was to strip the old structure off. Our techs started out with measurements and a basic knowledge of how these types of structures are built. Armed with these rudimentary tools, they did the first layout out of 1/4″ luan. The luan is easy to work with and very forgiving. This gave a good idea of how the finished product would look. We also cut out masonite window shapes to see what sizes would look best. Before committing to these, we did have to research to find good windows and make sure that they would fit the rough dimensions we had planned on.
2. The mold – After we were sure that the whole structure was perfect, we carefully disassembled all the parts to use for templates for the mold. The material we used for the mold is like a very high fiberboard which we chose for it’s stability properties. We did not want this to flex or distort during the fabrication of parts. We traced the luan templates out onto the fiberboard and cut them out, allowing for the differences between the 1/4″ material and the full 1″ material.
1. The Mock Up – The first step was to strip the old structure off. Our techs started out with measurements and a basic knowledge of how these types of structures are built. Armed with these rudimentary tools, they did the first layout out of 1/4″ luan. The luan is easy to work with and very forgiving. This gave a good idea of how the finished product would look. We also cut out masonite window shapes to see what sizes would look best. Before committing to these, we did have to research to find good windows and make sure that they would fit the rough dimensions we had planned on.
2. The mold – After we were sure that the whole structure was perfect, we carefully disassembled all the parts to use for templates for the mold. The material we used for the mold is like a very high fiberboard which we chose for it’s stability properties. We did not want this to flex or distort during the fabrication of parts. We traced the luan templates out onto the fiberboard and cut them out, allowing for the differences between the 1/4″ material and the full 1″ material.
 After the pieces were cut out, we assembled them all with drywall screws to dry fit the new structure. With the addition of some temporary bracing, we were able to lift the whole assembly and set down on the boat. With a bit of minor tweaking we were ready to proceed.
Since the fiber board did not have a gelcoat ready surface, we had to disassemble the structure again to start surfacing each piece. With multiple coats of epoxy and a lot of fairing, we are able to save time in subsequent projects on smoothing the surface again. Once again we reassembled the parts.
This time we put some permanent bracing on to keep all the parts together properly. We also put mulitple coats of wax on the newly surfaced parts to ensure the gelcoat did not stick. To get properly radiused corners, we used a wax filet. It was now time to start constructing the new part.
After the pieces were cut out, we assembled them all with drywall screws to dry fit the new structure. With the addition of some temporary bracing, we were able to lift the whole assembly and set down on the boat. With a bit of minor tweaking we were ready to proceed.
Since the fiber board did not have a gelcoat ready surface, we had to disassemble the structure again to start surfacing each piece. With multiple coats of epoxy and a lot of fairing, we are able to save time in subsequent projects on smoothing the surface again. Once again we reassembled the parts.
This time we put some permanent bracing on to keep all the parts together properly. We also put mulitple coats of wax on the newly surfaced parts to ensure the gelcoat did not stick. To get properly radiused corners, we used a wax filet. It was now time to start constructing the new part.
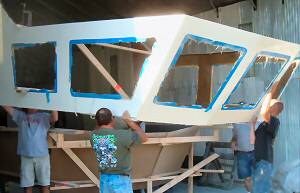
Hardtop being removed from mold
