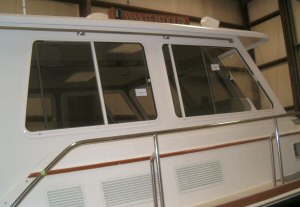
When we ended part III, we were still waiting for the windows to arrive. Much of the detail work revolved around having these in. But we were able to complete the painting and headliner.
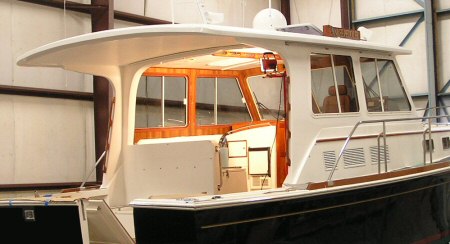
With the arches all painted with Awlgrip, the project begins to look like a finished boat. A lot of the fairing had to be done multiple times to ensure a perfectly smooth surface. Our painter did an excellent job – as good or better than factory work!
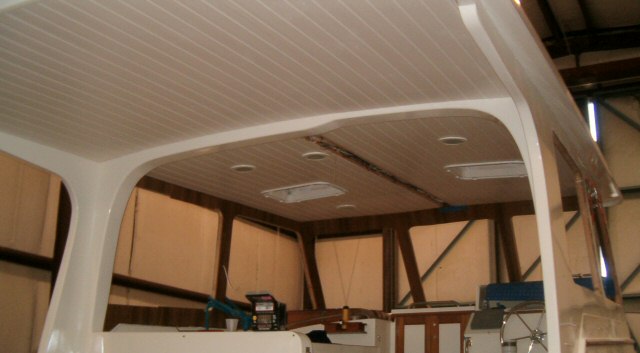
When the windows finally arrived, we were anxious to see how it would look since we catalog shopped them from Diamond Seaglaze. We were very pleased with the quality of the windows. We did decide, however, that the white interior trim rings against the teak detract from the look we were striving for. We will be pulling them off and painting them dark brown. We will be experimenting with several colors to determine which blends best.
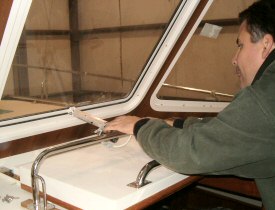
We are also adding a center window opener on this boat. The original boat already had the equipment, but it was set up to work with the stainless steel window assembly, not our independant windows. We were able to successfully adapt this with a litte extra work. In the picture to the left, you can also see how the stark white trim rings against the teak is too much. We spent a lot of time putting teak in this cabin and it would be counter productive to go this route.
The headliner on this boat was the same material that we used in the
custom hardtop we installed on the Grand Banks 46 last winter – a PVC beaded board style. The overall appearance is bright and it is easy to keep clean. It also has a classic look. But there was one more step we had to finish before installing the headliner.
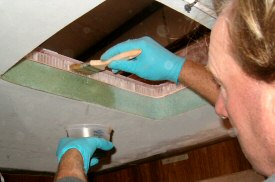
The overhead hatch wells had to be dealt with before proceeding. As you can see in the photo, this top is thick. All the foam and exposed edges where we cut through for the hatches needed to be sealed very tight to elimate any water intrusions if the hatches ever began to leak. Plus, hatches are not usually installed in this deep of a profile, so the lip of the trim ring does not meet the lip of the hatch. We had to paint the well and make it look like it was meant to be that way.
With that hole done, we could proceed with the headliner installation. We now are concentrating on teak trim around the windows and cabinside to structure seam, filling seams outside the boat for the new hardtop and a myriad of other details. The next installment should be the final one – along with delivery pictures.
We can put hardtops on just about any type of Express Boat – our next slated project is a Sabre 38 Express. You may also enjoy our
Eastbay 43 Custom Enclosure project, which could be adapted to a project like this. If you have a custom project in mind for your boat, we would be happy to
discuss it with you.
 When we ended part III, we were still waiting for the windows to arrive. Much of the detail work revolved around having these in. But we were able to complete the painting and headliner.With the arches all painted with Awlgrip, the project begins to look like a finished boat. A lot of the fairing had to be done multiple times to ensure a perfectly smooth surface. Our painter did an excellent job – as good or better than factory work!
 When the windows finally arrived, we were anxious to see how it would look since we catalog shopped them from Diamond Seaglaze. We were very pleased with the quality of the windows. We did decide, however, that the white interior trim rings against the teak detract from the look we were striving for. We will be pulling them off and painting them dark brown. We will be experimenting with several colors to determine which blends best.
 We are also adding a center window opener on this boat. The original boat already had the equipment, but it was set up to work with the stainless steel window assembly, not our independant windows. We were able to successfully adapt this with a litte extra work. In the picture to the left, you can also see how the stark white trim rings against the teak is too much. We spent a lot of time putting teak in this cabin and it would be counter productive to go this route.
The headliner on this boat was the same material that we used in the custom hardtop we installed on the Grand Banks 46 last winter – a PVC beaded board style. The overall appearance is bright and it is easy to keep clean. It also has a classic look. But there was one more step we had to finish before installing the headliner.
 The overhead hatch wells had to be dealt with before proceeding. As you can see in the photo, this top is thick. All the foam and exposed edges where we cut through for the hatches needed to be sealed very tight to elimate any water intrusions if the hatches ever began to leak. Plus, hatches are not usually installed in this deep of a profile, so the lip of the trim ring does not meet the lip of the hatch. We had to paint the well and make it look like it was meant to be that way.
With that hole done, we could proceed with the headliner installation. We now are concentrating on teak trim around the windows and cabinside to structure seam, filling seams outside the boat for the new hardtop and a myriad of other details. The next installment should be the final one – along with delivery pictures.
 We can put hardtops on just about any type of Express Boat – our next slated project is a Sabre 38 Express. You may also enjoy our Eastbay 43 Custom Enclosure project, which could be adapted to a project like this. If you have a custom project in mind for your boat, we would be happy to discuss it with you.
